
1. Introduction to Custom Fields
In Zoho Marketing Automation, contact management plays a crucial role in running targeted and personalized marketing campaigns. While standard fields like name, email, and phone number provide basic contact details, businesses often require additional information to segment and engage their audience more effectively. This is where custom fields come in.
Custom fields allow businesses to store extra details specific to their marketing and sales needs. These could include customer preferences, industry type, subscription status, purchase history, or any other relevant data. By leveraging custom fields, businesses can:
-
Collect and categorize customer data more efficiently.
-
Personalize email marketing and automation workflows.
-
Create advanced segmentation for targeted campaigns.
-
Improve lead scoring and sales qualification processes.
With the ability to define unique data points, custom fields enhance marketing automation by providing deeper insights into customer behavior, enabling businesses to craft more data-driven and effective marketing strategies.
2. Accessing Custom Fields in Zoho
To effectively use custom fields in Zoho Marketing Automation, users must first locate the section where these fields can be created and managed. Zoho provides an intuitive interface that allows businesses to add, edit, and organize custom fields for better contact segmentation and personalization.
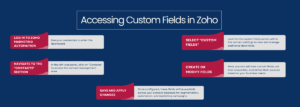
To access custom fields, follow these steps
-
Log in to Zoho Marketing Automation –
Use your credentials to enter the dashboard.
-
Navigate to the “Contacts” Section –
In the left-side panel, click on “Contacts” to access the contact management area.
-
Select “Custom Fields” –
Look for the custom fields option within the contact settings to view and manage additional data fields.
-
Create or Modify Fields –
Here, you can add new custom fields, set their properties, and define their purpose based on your business needs.
-
Save and Apply Changes –
Once configured, these fields will be available across your contact database for segmentation, automation, and marketing campaigns.
Accessing and managing custom fields in Zoho Marketing Automation ensures that businesses can store relevant customer data, enabling better personalization and targeted engagement.
3. Types of Custom Fields Available
Zoho Marketing Automation provides a range of custom field types to help businesses collect and store relevant customer data beyond the standard contact fields. These custom fields allow for better segmentation, personalization, and automation in marketing campaigns. Depending on the type of information a business needs, Zoho offers several field types to accommodate different data structures.
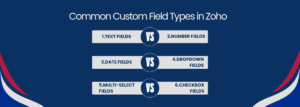
Common Custom Field Types in Zoho
-
Text Fields –
Used to store short-form data such as names, job titles, or customer preferences.
-
Number Fields –
Ideal for numerical values like customer IDs, purchase amounts, or loyalty points.
-
Date Fields –
Helps track key dates like sign-up dates, subscription expirations, or event participation.
-
Dropdown Fields –
Allows users to select a single option from a predefined list, useful for fields like industry type or lead source.
-
Multi-Select Fields –
Enables users to select multiple options from a list, commonly used for product interests or service preferences.
-
Checkbox Fields –
Provides a simple yes/no or true/false option, helpful for opt-ins, subscription status, or customer preferences.
By selecting the right type of custom fields, businesses can better organize contact information, automate targeted campaigns, and improve data accuracy in Zoho Marketing Automation.
4. Configuring and Using Custom Fields
Custom fields in Zoho Marketing Automation allow businesses to store and organize additional contact details beyond standard fields. Proper configuration of these fields helps businesses segment contacts, automate workflows, and personalize marketing campaigns to improve engagement and conversion rates.
Steps to Configure Custom Fields in Zoho
-
Access the contacts section –
Navigate to the “Contacts” tab in Zoho Marketing Automation.
-
Go to custom fields –
Select “Custom Fields” under the settings or contact management panel.
-
Create a new field –
Click “Add Custom Field” and choose the appropriate field type (text, number, dropdown, etc.).
-
Set field properties –
Define the field name, default values, and whether it is mandatory or optional.
-
Organize and save –
Arrange the fields for better usability and save the changes to apply them to the contact database.
Using Custom Fields for Marketing Automation
Once custom fields are configured, they can be leveraged to enhance marketing efforts:
-
Contact segmentation –
Filter and group contacts based on custom field data, such as industry, preferences, or purchase history.
-
Personalized email campaigns –
Use custom fields to insert dynamic content, address customers by name or tailoring messages to their interests.
-
Automated workflows –
Trigger specific actions based on custom field values, such as sending follow-up emails to leads with high intent.
By properly configuring and using custom fields, businesses can create a more personalized and data-driven marketing strategy within Zoho Marketing Automation.
5. Syncing Custom Fields with Zoho CRM
For businesses using both Zoho Marketing Automation and Zoho CRM, syncing custom fields ensures that contact data remains consistent across platforms. By mapping custom fields between the two systems, businesses can seamlessly transfer lead information, improve segmentation, and enhance sales and marketing alignment.
Steps to Sync Custom Fields with Zoho CRM
-
Access the integration settings –
Navigate to Zoho Marketing Automation and open the CRM integration settings.
-
Select custom field mapping –
Choose the option to map fields between Zoho Marketing Automation and Zoho CRM.
-
Match corresponding fields –
Align custom fields in Marketing Automation with their counterparts in Zoho CRM to ensure data consistency.
-
Enable real-time syncing –
Activate automatic updates so that changes made in one platform reflect in the other.
-
Save and test the sync –
Verify that custom field data is correctly transferred and appears as expected in both systems.
Benefits of Syncing Custom Fields
-
Ensures accurate and up-to-date contact data across both platforms.
-
Helps sales teams access marketing insights, such as lead engagement and preferences.
-
Enables better segmentation by using CRM data for targeted marketing campaigns.
-
Reduces manual data entry, preventing errors and saving time.
By syncing custom fields between Zoho Marketing Automation and Zoho CRM, businesses can streamline their workflow, improve lead management, and enhance overall marketing and sales efficiency.
6. Best Practices for Custom Fields Management
Effectively managing custom fields in Zoho Marketing Automation is essential to maintaining an organized and efficient contact database. Without proper management, excessive or redundant fields can clutter data, making it difficult to segment and personalize marketing campaigns. By following best practices, businesses can ensure that custom fields remain relevant, accurate, and useful.
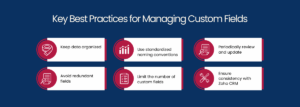
Key Best Practices for Managing Custom Fields
-
Keep data organized –
Structure custom fields logically to ensure easy access and consistency across teams. Group similar fields together and remove outdated or unnecessary ones.
-
Avoid redundant fields –
Duplicate or overly specific fields can create confusion and clutter. Before adding a new field, check if existing fields can serve the same purpose.
-
Use standardized naming conventions –
Clearly label fields to ensure that all team members understand their purpose and use them correctly.
-
Limit the number of custom fields –
Too many fields can slow down data retrieval and complicate segmentation. Only create fields that add real value to your marketing and sales strategies.
-
Periodically review and update –
Regularly audit custom fields to remove outdated information, refine field values, and ensure alignment with current business needs.
-
Ensure consistency with Zoho CRM –
If syncing with Zoho CRM, maintain consistency between field names and formats to prevent data discrepancies.
By following these best practices, businesses can optimize their use of custom fields, improve data accuracy, and enhance marketing automation workflows in Zoho Marketing Automation.
Conclusion
Managing custom fields effectively in Zoho Marketing Automation is key to maintaining a well-organized and efficient contact database. By carefully configuring, syncing, and regularly updating custom fields, businesses can enhance their segmentation, automate workflows, and deliver more personalized marketing campaigns. Ensuring data consistency across Zoho CRM and Marketing Automation further improves collaboration between marketing and sales teams. With proper management and best practices in place, businesses can maximize the potential of custom fields to drive engagement, improve lead qualification, and optimize their overall marketing strategy.